Table of Contents
At the time of writing, we have been travelling independently around Kenya for a month, with six weeks planned in total. During that time, we have not used cash once.
Not occasionally. Not just in Nairobi. Not at all.
We have paid for supermarkets, restaurants, small shops, taxis, boda-bodas and everyday purchases using M-PESA. In our experience, everyone accepts it. Once we had a Safaricom number and M-PESA account, paying for things became remarkably easy.
If you are planning a trip to Kenya, setting up M-PESA should be one of the first things you do after arriving. This guide explains how tourists can register for M-PESA, add Kenyan shillings directly from Wise, pay businesses and individuals, and avoid making expensive mistakes. We know this is a long post, but it covers everything about buying, setting up and using M-PESA, including dangers and pit falls. In the end it’s very easy to use and you should use it!
What Is M-PESA?
M-PESA is a mobile money service operated in Kenya by Safaricom. Your account is connected to your Kenyan mobile number and works like a digital wallet.
You can use M-PESA to:
- Pay in shops and restaurants
- Send money to another person
- Pay taxi and boda-boda drivers
- Pay bills and business accounts
- Buy airtime and mobile data
- Receive money
- Check your balance and transaction history
No more paying extra for taxi because you don’t have small change, this app allows exact amounts.
You do not need a Kenyan bank account. Once your M-PESA account has been registered and money has been added to it, you can make payments directly from your phone.
Who Uses M-PESA in Kenya?
Almost everyone.
M-PESA is not a specialist travel payment system or something used only in large cities. It is part of everyday life in Kenya.
We have used it with supermarkets, cafés, restaurants, accommodation providers, taxi drivers, boda-boda riders and small independent businesses. Even when someone does not have a business till number, they can usually accept a direct payment to their personal mobile number.
During our independent journey around Kenya, we have not encountered anyone who could not accept M-PESA.
Why Use M-PESA Instead of Cash?
Before arriving, we expected to use a mixture of cash, bank cards and mobile payments. In reality, M-PESA has handled everything.
There is no need to search for an ATM, carry large amounts of Kenyan shillings or worry about receiving change. Payments happen immediately, and both you and the recipient receive confirmation.
Other advantages include:
- You have a record of every payment.
- You can see the recipient’s registered name before sending money.
- You do not need to expose your bank card in unfamiliar places.
- You can transfer Kenyan shillings into your wallet using Wise.
- You can pay individuals as easily as established businesses.
- It works for very small everyday transactions.
Most importantly, M-PESA is what people in Kenya already use. You are not asking a business to accommodate an unusual foreign payment method.
Is M-PESA Safe?
We have found M-PESA very safe and straightforward to use, but you still need to pay attention.
Every transaction must be authorised with your M-PESA PIN or biometrics. Before completing a personal transfer, the recipient’s registered name is shown on the screen. This gives you an important opportunity to catch an incorrect phone number.
The greatest risk is not normally the system itself. It is sending money to the wrong person, entering an incorrect till number or allowing someone else to handle your phone.
Used carefully, M-PESA is one of the most convenient payment methods we have encountered while travelling.
Getting a Safaricom SIM Card in Kenya
You can buy a Safaricom physical SIM card or arrange an eSIM at the airport when you arrive in Kenya. This is the easiest option because you can register your number and activate M-PESA before leaving the airport.
Visit the official Safaricom counter rather than buying a SIM from an unofficial seller. Take your original passport, as it is required to register the number and M-PESA account in your name.
Tell the member of staff that you want:
- A Safaricom prepaid physical SIM or eSIM
- A suitable mobile data package
- M-PESA activated on the number
If you choose an eSIM, check that your phone supports eSIMs and is not locked to your home network. It is also useful if you want to keep your usual physical SIM active for calls, messages or banking verification.
Do not assume that buying a Safaricom SIM or eSIM automatically activates M-PESA. Ask the member of staff to set up the M-PESA wallet and confirm that everything is working before you leave the counter.
You will be asked to create an M-PESA PIN during registration. Enter this yourself and do not share it with the person helping you.
Once the number is active, install My OneApp and complete the first login while connected to Safaricom mobile data. Doing this at the airport means you can start using M-PESA immediately for your taxi, accommodation and other expenses..
Physical SIM or eSIM?
Safaricom offers physical SIM cards and eSIM services. If your phone supports eSIM, ask the Safaricom staff whether they can set it up for you when registering your number.
An eSIM is useful if you want to keep your usual SIM active for calls, messages or banking verification. A physical SIM is equally suitable for M-PESA.
Whichever option you choose, make sure the Safaricom line is active on your phone and registered to the same name shown in your passport.
Setting Your M-PESA PIN
During registration, you will be asked to create an M-PESA PIN. This PIN protects your wallet and authorises transactions.
Choose a number that you can remember but that is not easy for someone else to guess. Do not use your birthday, part of your phone number or a sequence such as 1234.
Enter the PIN yourself. Do not tell it to the person helping you, and do not allow anyone to choose it for you.
Safaricom employees, drivers, hotel staff and shopkeepers do not need your M-PESA PIN or verification code.
Where to Download My OneApp
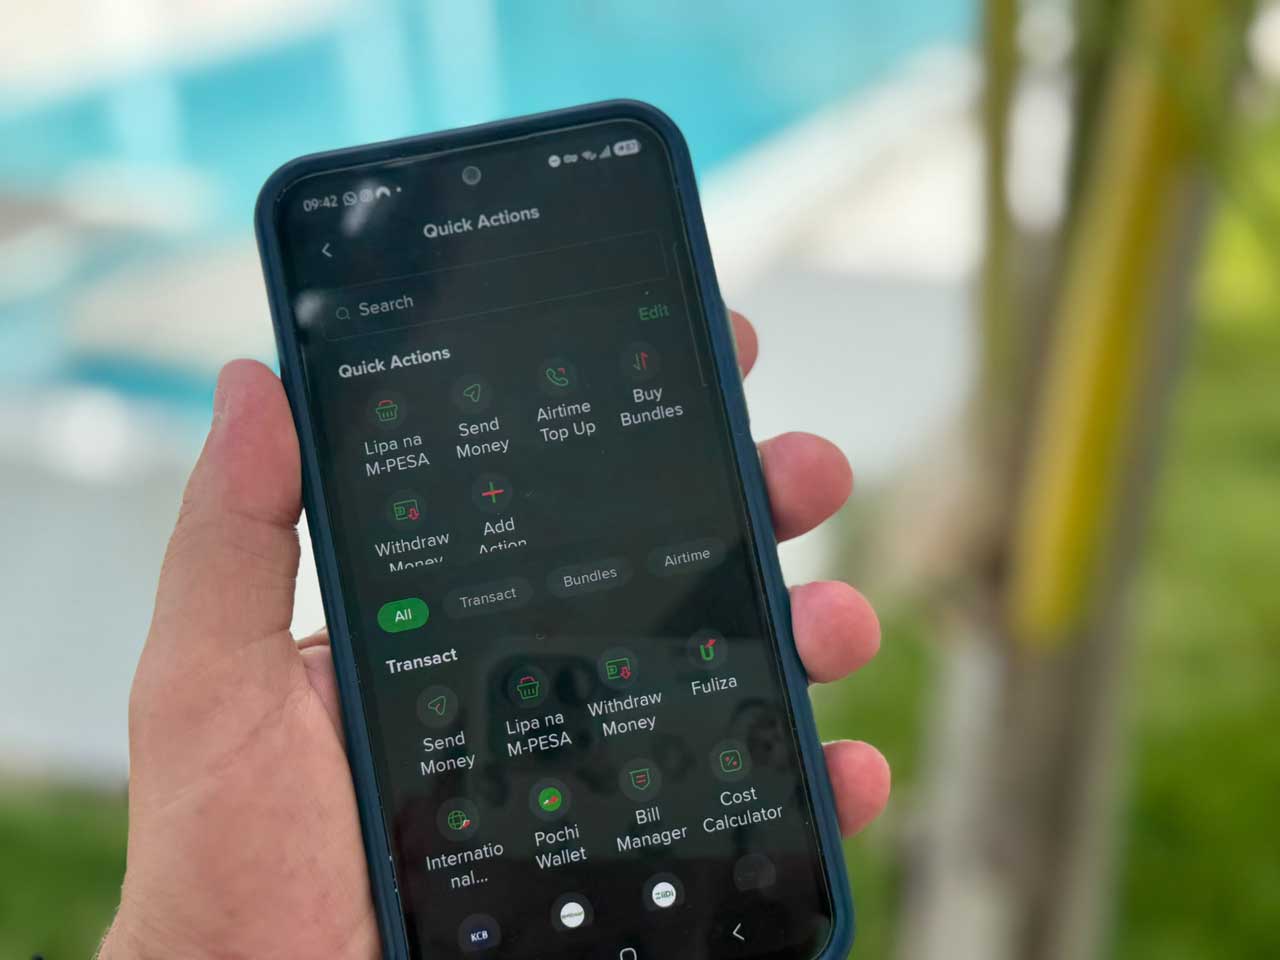
Safaricom’s main consumer application is currently called My OneApp. It brings together M-PESA, airtime, data bundles and other Safaricom services.
Download it only from an official app store and confirm that the developer is Safaricom:
 |  |
 |
The name has changed from the former M-PESA app, so older instructions and screenshots may still refer to the M-PESA Super App.
You can also access some Safaricom account functions through My OneApp Lite in a browser, but the mobile app is the easiest option for everyday payments.
Setting Up My OneApp
Install the app after your Safaricom number and M-PESA account have been activated.
For the initial registration:
- Make sure the Safaricom SIM or eSIM is active in your phone.
- Turn on Safaricom mobile data.
- Temporarily turn off Wi-Fi if the app cannot verify your number.
- Open My OneApp.
- Enter your Safaricom mobile number.
- Follow the verification instructions.
- Enter your M-PESA PIN when requested.
- Enable fingerprint or facial recognition.
Safaricom advises using mobile data for the first secure login. Once registration is complete, the app can normally be used over mobile data or Wi-Fi.
Enabling biometrics makes everyday payments quicker while still preventing someone else from opening the app and accessing your wallet.
How to Add Money to M-PESA Using Wise
We use Wise to transfer Kenyan shillings directly to our M-PESA account. It means we can add money from our existing bank account without finding an ATM, withdrawing cash or visiting an M-PESA agent.
We already use Wise when travelling because it lets us hold and exchange different currencies in one account, clearly displays the exchange rate and transfer fee before we confirm, and makes it easy to send money internationally. In Kenya, being able to transfer money directly into M-PESA has made it particularly useful.
If you do not already have an account, you can sign up for Wise using our referral link. We may receive a referral benefit if you join through this link, at no additional cost to you.
Transferring money from Wise to your M-PESA wallet
You will need:
- The full name registered to your M-PESA account
- Safaricom as your mobile provider
- Your Kenyan mobile number in international format
If your Safaricom number is 0712 345 678, enter it as:
+254 712 345 678
Remove the first zero and replace it with Kenya’s +254 country code.
The exact wording in Wise may change slightly, but the process is generally:
- Open Wise and select Send.
- Choose Kenyan shillings as the receiving currency.
- Add yourself as the recipient.
- Select the mobile wallet or M-PESA option.
- Enter your full name exactly as it was registered by Safaricom.
- Select Safaricom as the mobile provider.
- Enter your mobile number beginning with
+254. - Enter the amount you want to transfer.
- Review the exchange rate, transfer fee and recipient details.
- Confirm the transfer.
Check the name and phone number carefully before sending. They must match the information registered to your M-PESA account.
In our experience, money sent from Wise usually appears in our M-PESA balance within five minutes. You will receive SMS confirmation once it arrives, and Wise also provides an estimated delivery time before you approve the transfer. We recommend topping up before you need to make a payment rather than waiting until you are standing at the counter.
Wise currently supports transfers of up to KES 250,000 per transaction and KES 500,000 per day to an M-PESA wallet, although limits can change. You can check the current Wise guidance for Kenyan shilling transfers before transferring a large amount.
Wise Transfer Fees
Wise shows the exchange rate, transfer fee and amount arriving in your M-PESA wallet before you approve the transfer.
As a real example from our trip, it cost us around €3 to send €100, with KES 14,452 arriving in our M-PESA balance. The transfer took no more than five minutes.
Fees and exchange rates change, so your result may be different. Always check the final fee and the amount of Kenyan shillings due to arrive before confirming the transfer. For us, the convenience of transferring money directly to M-PESA was easily worth the fee. We did not need to find an ATM, pay withdrawal charges or carry cash around Kenya.
How to Pay with M-PESA
There are several ways to pay, depending on whether you are paying a business or an individual.
Ask the recipient which option they use. They will usually give you a till number, Paybill number or mobile phone number.
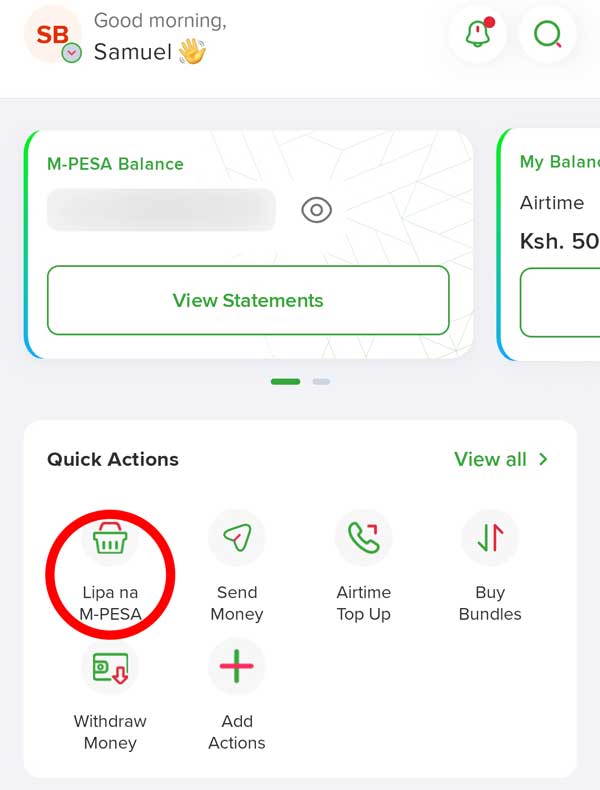
Paying Shops and Restaurants with Lipa na M-PESA
Businesses commonly accept payments through Lipa na M-PESA.
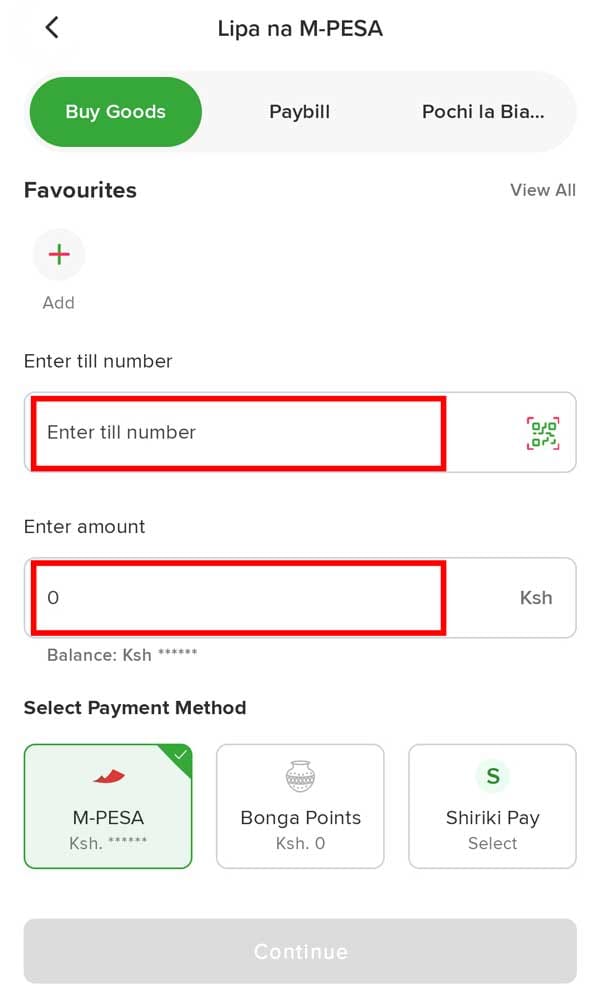
The most common option in shops, cafés and restaurants is Buy Goods, which uses a business till number.
To make a payment:
- Open My OneApp.
- Enter the M-PESA section.
- Select Pay or Lipa na M-PESA.
- Select Buy Goods.
- Enter the business till number.
- Enter the amount.
- Review the business name and payment details.
- Confirm using your PIN or biometrics.
Till numbers are often displayed beside the counter, printed on the bill or provided by a member of staff.
Check that the business name displayed in the app looks correct before confirming the payment. If it does not, stop and ask the member of staff to check the number.
Paying a Paybill Number
Some hotels, transport companies, utilities and larger organisations use a Paybill number rather than a Buy Goods till.
For a Paybill payment, you will normally need:
- The business number
- An account or reference number
- The amount
Select Paybill in the M-PESA payment menu, then enter the information supplied by the business.
The account number matters. It tells the company which booking, bill or customer the payment belongs to.
Paying Taxis, Boda-Bodas and Individuals
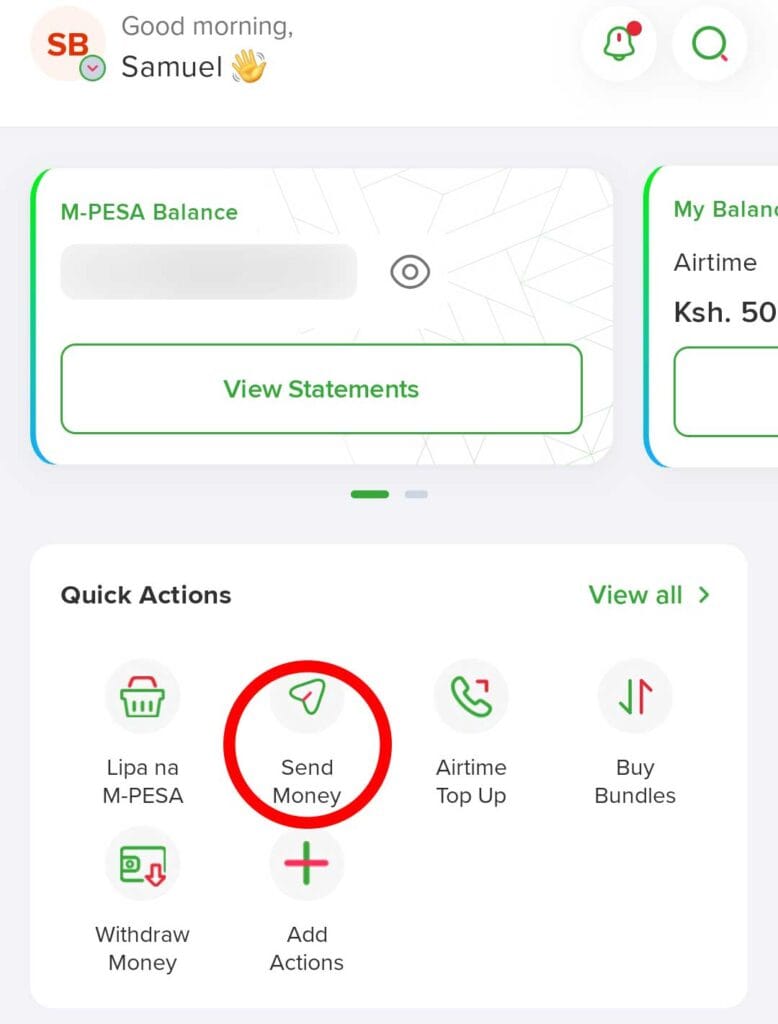
Taxi drivers, boda-boda riders and individuals will often ask you to use Send Money.
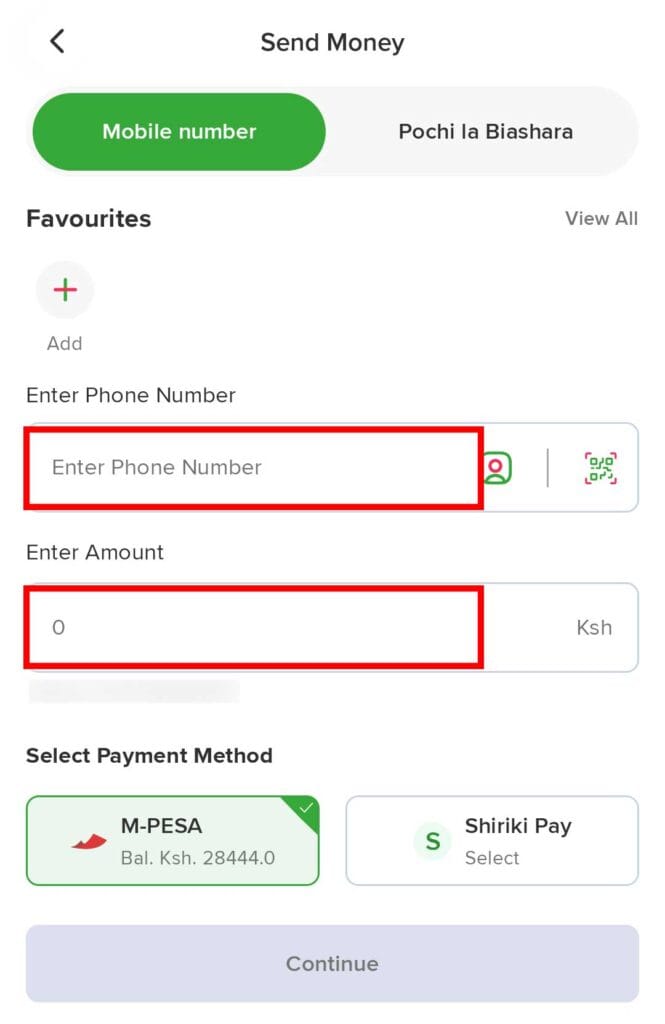
To send money to someone:
- Open My OneApp.
- Select Send Money.
- Enter the recipient’s Kenyan mobile number.
- Enter the amount.
- Check the recipient’s name!!!
- Confirm the transaction using biometrics or your M-PESA PIN.
- Wait for the confirmation message.
The registered name is one of the most useful security features in M-PESA.
Before getting into a taxi or starting a boda-boda ride, ask the driver’s name. When you enter their phone number, that same name should appear in the app before you send the money.
If the name is different, do not continue until the driver has confirmed that you have the correct number.
Some small businesses and drivers may use Pochi la Biashara, which allows them to receive business payments through their mobile number. Follow the payment method requested, but always check the displayed name before confirming.
Always Check the Recipient’s Name
This is the most important rule when using M-PESA:
Never confirm a transaction until you have checked the recipient’s name.
A single incorrect digit can send your money to somebody else. The app displays the registered recipient or business name so that you can verify it before payment.
For an individual payment:
- Ask the recipient’s name.
- Enter the number yourself.
- Read the displayed name.
- Confirm the amount.
- Only then authorise the payment.
For a business payment:
- Check the till or Paybill number.
- Check the displayed business name.
- Check the amount.
- Confirm the payment yourself.
Do not rush just because someone is waiting behind you.
What Happens if You Send Money to the Wrong Person?
Act immediately.
Safaricom has a reversal process for payments sent in error. One documented method is to forward the transaction code from the confirmation message to 456. You can also look for the reversal option in the app or contact Safaricom customer support.
However, you should not assume that every mistaken payment will be recovered. A completed M-PESA transaction may be treated as final, and reversals can require Safaricom to contact the recipient and investigate what happened.
That is why checking the recipient’s name before pressing send is so important. Preventing the mistake is considerably easier than trying to recover the money afterwards.
M-PESA Security Tips for Travellers
Use biometrics
Enable fingerprint or facial recognition in My OneApp. This prevents someone from accessing your M-PESA wallet simply because they have your unlocked phone.
Keep your PIN private
Never tell anyone your M-PESA PIN. Safaricom staff, shopkeepers and drivers do not need it.
Never share a verification code
Do not give an OTP or verification code to anyone who calls or messages you. Safaricom warns customers about fake calls, messages and reversal requests.
Enter the payment details yourself
Do not hand your unlocked phone to a stranger so they can enter their number or till information. Ask them to read the number to you or show it to you while you type it.
Check the name and amount
Read the entire confirmation screen. Make sure both the recipient and amount are correct.
Verify the payment on your own phone
After paying, check the confirmation inside your app or in the SMS sent to your Safaricom number. Do not rely on a message displayed on someone else’s phone.
Keep your Safaricom line secure
Protect your phone with a strong passcode and report a lost device or SIM to Safaricom immediately.
Can You Use M-PESA Without the App?
Yes. M-PESA can also be accessed through the Safaricom SIM Toolkit or by dialling *334# from your registered Safaricom number.
This is useful if:
- The app is temporarily unavailable
- Your phone cannot run My OneApp
- You have a poor data connection
- You need an alternative way to complete a payment
The app is easier and provides a clearer confirmation screen, but it is reassuring to have another way to access your money.
Do Tourists Still Need Cash in Kenya?
Based on our own experience, no.
We are travelling independently in Kenya for six weeks. After our first month, we had not used cash once. Everyone we needed to pay accepted M-PESA, from established shops and restaurants to taxi drivers and individuals.
M-PESA has not felt like a backup payment method. It has been our main and only way of paying for everyday life in Kenya.
Setting it up takes a little effort when you first arrive, but once your Safaricom number, M-PESA wallet and My OneApp are working, travelling without cash becomes remarkably simple.
Final Thoughts on Using M-PESA in Kenya
M-PESA is one of the first things we would recommend setting up for an independent trip around Kenya.
Get a Safaricom number, register the M-PESA wallet with your passport, install My OneApp and transfer Kenyan shillings directly into the account using Wise. From that point, you can pay almost anyone directly from your phone.
The system is fast, widely accepted and easy to use. Just remember the golden rule: check the recipient’s name, check the amount and only then press send.
After travelling around Kenya for a month without using cash once, we cannot imagine doing the trip any other way.